
Single Flaring Tool Instruction
Single flares are usually sufficient for copper tubing. A single flare is what the
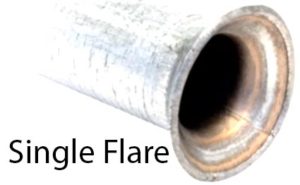
name suggests – the tubing is just flared at the end.
1. Cut the tubing with a tubing cutter to avoid deformation.
2. Clean the end of the tubing.
3. Slip a flare nut onto the tubing so that the threaded portion of the nut points toward the end being flared.
4. Insert the end of the tubing into the clamping portion or die block of the flaring tool. Tighten the clamp or clamps to secure the tubing between the jaws of the die block.
5. Assemble the tool, tighten the press to lower the cone and form a flare.
6. Loosen and remove the press.
7. Assemble the fitting and check for leaks.
Making Double Flares
A double flare is made by the end of the tubing being rolled/folded inside itself, then the double layer is flared.

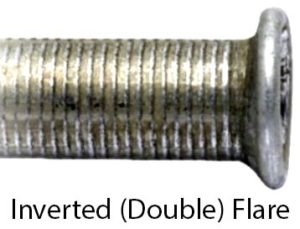
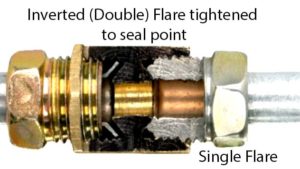
Brake lines (and most steel lines) are double flared.
 Shankly Double Flaring Tool, Professional Double Flaring Tool Kit
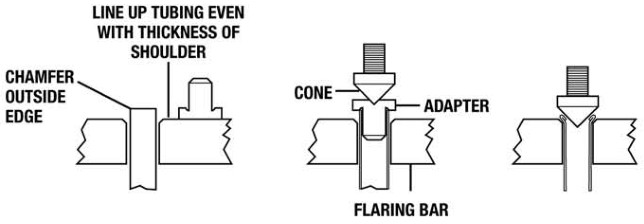
1. Loosen the flaring bar.
2. Cut the tube and remove any burrs.
3. Insert the tubing into the proper sized hole. The tubing should extend a distance equal to the width of the shoulder on the corresponding adapter.
4. Tighten the wing nut: first – closest to the tube, then another one.
5. Grease the adapter and insert into the tubing. Make sure the adapter is straight. Slightly turn the yoke to lock into place. Secure this locked position with thumb and forefinger.
6. Screw down one flaring cone until it engages with the adapter.
7. Slightly back off the flaring cone and remove the adapter. Screw the cone down tightly onto the tubing. This procedure forms a 45° double flare, folding the tubing back on itself.
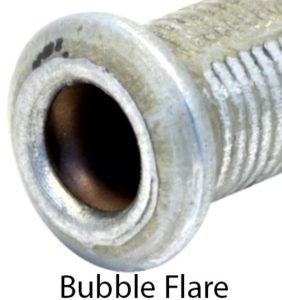
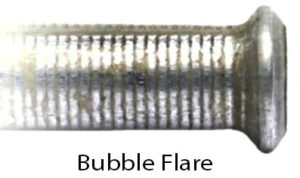
Making Bubble Flare
The biggest thing to eliminate leakage is to make sure you are using a high-quality tool that can perform “bubble flares” or DIN flares.
Auto Amazon Links: No products found. http_request_failed: A valid URL was not provided. URL: https://ws-na.amazon-adsystem.com/widgets/q?SearchIndex=All&multipageStart=0&multipageCount=20&Operation=GetResults&Keywords=B0015SBV5E&InstanceId=0&TemplateId=MobileSearchResults&ServiceVersion=20070822&MarketPlace=US Cache: AAL_cf4984a78116a190ea6647abde9489a4
My recommendation – the Eastwood Professional Brake Tubing Flaring Tool that makes most any commonly used flares. With the tool, the flares are made with a simple one step process and you can be assured it won’t leak.
Auto Amazon Links: No products found. http_request_failed: A valid URL was not provided. URL: https://ws-na.amazon-adsystem.com/widgets/q?SearchIndex=All&multipageStart=0&multipageCount=20&Operation=GetResults&Keywords=B002QBRHD4&InstanceId=0&TemplateId=MobileSearchResults&ServiceVersion=20070822&MarketPlace=US Cache: AAL_56f9346e2894fe7898d7b6ab0d3f4fc5
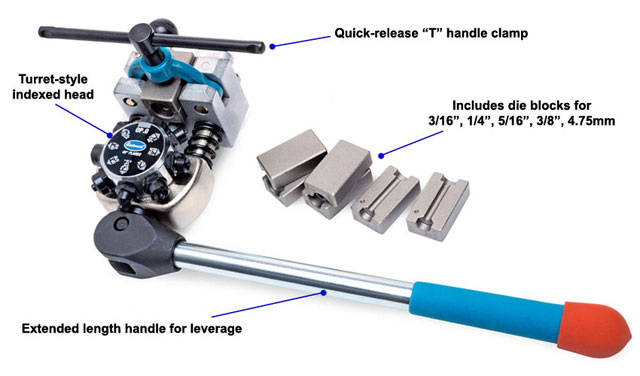
The Eastwood Pro Brake Flaring Tool lets you create in minimal time 3 kinds of precision flares, in any of 5 sizes of tubing.
It creates 45° bubble, double, and single brake flares. Works with soft metal tubing, steel, and stainless steel. “T”-handle clamp holds the tube-retaining dies securely. Includes 3/8″, 5/16″, 1/4″, 3/16″ and 4.75mm tube-retaining dies.
I have Eastwood one and flares produced with this tool are really great.
But if you overtighten the die when securing the pipe you will leave marks in the soft copper piping… it takes a few tries to get it just right. Better to practice on some scrap tubes before flaring the actual project line set.
I’ve bougt KTI tool. This is a great tool overall, but there is one issue. There are some sizes that it will not work with. I needed to do some 6mm lines. The guide states that to do 6mm you need a 6mm die. However, what it does not say is that there is no 6mm die available (even from the manufacturer) do work with 6mm lines. So if you need to do 6mm lines, don’t waste your money. You will just have an expensive tool to look at and admire.
I use ATD Double Flaring Tool almost every day. I’m pleased with it, nothing spectacular, but it gets the job done just fine. There are probably better ones on the market, but for the price, I have no complaints
I have GearWrench. It is so well made and nice quality. A little tricky to do the double flare kept wanting to walk over on me. With a couple test crimps, all is well. Everything, even the reamer, feels high quality.
Has anybody tried drill bit flaring tool?
Works fine?
I had to rebuild the brake system on my Car-Hauler trailer, and without the Ridgid tool there is no way I could have completed the task.
I only wish I could also make regular flares also but I ordered a bubble flare tool not a do all kit so i am pleased.
My advice – choose Neiko. Works very nicely, though I have to say I have not had to slam on the brakes and pray for sturdy underwear since I used this set to replace my brake lines. When that happens, I’ll come back and provide more feedback. Or maybe I won’t. Which would constitute a “thumbs down,” I suppose.
Buy Ridgid. High quality. Have used it several times to flare soft copper on mini-split AC units. Be certain to center (align) the clamp properly. Failure to do so will make your flare off center. Don’t blame the tool for your incorrect use. This is a great tool at a great price
If you are a hobbyist, you don’t need to buy something too expensive. Every tool works, does the flare, but you’ll need a good file and attention to detail to finish the edges.
I am not original – RIDGID 23332 345 Flaring Tool is my best tool.
And all my colleagues have it too
My workhorse is cheap Chinese tool. I was having problems with small kinks in the flare.
Found that I was over tightening screw that holds brake line between dies.
Once I found the right torque my double flares look perfect.
The Ridgid tool is the fastest and easiest tool I’ve ever used to make a perfect flare and double flare. a five year old could do it in two minutes. GREAT TOOL!!!
Comments are even better than the article 🙂
I went through two of the cheaper brake line flaring tools before I bought this one. Don’t waste your time or money on the less expensive and inferior kits. This is the best way to flare brakes lines, period. It was so easy compared to the other kits. Ive done a complete set of custom lines on a 1980 scout II and a 1965 fastback mustang. Save yourself the time and frustration and get this brake line flanger.
I’ve bought a cheap tool to flare fittings for HVAC unit. Worked great, no leaks.
Had to adjust the bar part with a hammer though to get the two pieces lined up.
Not a pro tool but fine for a do it DIYer.
I prefer Ridgid – rugged, well built, and performed exactly the way it was designed
Big brands like Yellow Jacket and Ridgid are usually flawless
I like Flexison one – great product. Same thing as the yellow jacket flaring tool. Just don’t have the name on it.
I like Ridgid – this is a must have tool if you are doing any HVAC or other tube flaring.
My first tool was from Homedepot. I hate to return things but one maked a mark on the pipe because the black metal that hold the pipe together it’s uneven and when you tight it to make the flare it leaves a huge mark that the nut can not run freely.
I think, next will be Ridgid
That is mine – Flexzion tool
I flared 8 ends for a mini split heat pump install and it worked great. I can see how the ends could be flared too thin with a conventional tool without a clutch head.
The pipe used in these systems is very soft and this tool worked well.
I bought cheap tool for a mini split as the flares are critical. The tubing would not stay in the holder. We tried it on 1/4 and larger and it slipped on all of the tubing no matter what you did. I had another technician try it and he could not get it to stay on 1/4 or larger. There are no grooves inside the dies to hold the tubing. It will go back. We went back to a Rigid flaring tool, rotated our tubing to get equal flairs and they held. Very disappointed.
I use Yellow jacket – unique design over previous tool I used. Very functional and works like a dream. Just remember to use the lubricant as directed and you will get a great flare every time. Highly recommend this tool.
My favorite is Yellow Jacket. This thing is ingenious. All the pipe sizes are there, just rotate the two wheels to the desired size, insert the tubing, tighten the large wing nut. Then screw in the t-handle.
I have General tools one. If you need to flare tubing, this is the tool for you. However, if you want to do double flares, you will need adapters. Not sure if you can buy those separately but even if you have to buy a cheap HF tool to get them, it’s worth it. Plan to put it to full use this weekend when I finish my brake line!